Successful vectorization is dependent on the conditions under which a scanner duplicates your drawing. You can’t just convert any raster image to a vector image. Granted, some documents, from the onset, may be too dirty, may contain stains, or may be drawn in very faint lines such that the scanner can’t pick anything. Alternatively, some details therein may be overlapping. That, or, the drawings could be too small to be digitized despite choosing the highest dpi resolution that your scanner can support. (On that note, we have a helpful article on choosing the best scanner for raster to vector conversion.)
All these factors point to the drawing (such as floorplans) as the problem. At the same time, though, other issues arise because of the scanner itself and the settings you, as the user, choose. This, therefore, underscores the importance of scanner settings for raster to vector conversion. You can only successfully convert the raster image of a technical drawing to a vector image if you scan it in monochrome. Yet, a scanner allows for other scanning conditions, e.g., grayscale and color. But their existence doesn’t mean that you should use them.
There are other similar settings that you should know about and set on your scanner before scanning your technical drawing, if you’re looking to avoid getting frustrated. In this article, I’ll discuss the essential scanning tips, thereby detailing the fundamental scanner settings for raster to vector conversion. Armed with these tips, you’ll eliminate many of the issues that prevent successful vectorization.
Table of Contents
What you should know about scanners
Given that this article is about technical drawings, the main focus is on large format scanners and not office scanners. The latter isn’t ideal for duplicating GIS or CAD drawings and should only be used in an office setting to scan documents such as letters.
Large-format scanners are much more specialized. They contain state-of-the-art components that are guaranteed to yield the best results. Thanks to their sophisticated hardware, i.e., sensors, source of lighting (LEDs), and lenses, in addition to the firmware/software that makes usage possible, large-format scanners generate usable and quality scans that are perfect for raster to vector conversion.
Well, they’re marketed as such by the manufacturer. But for optimum results, there are settings you should use. These include the resolution, scanning mode, threshold value, and even the file format you choose to save the scanned image. When set appropriately, these scanner settings combine to yield quality scanned images perfect for raster to vector conversion.
Not using them would present a situation whereby you have a quality large-format scanner at your disposal, but the scanned images are trash and unusable for vectorization purposes. It would be a waste, considering that some large format scanners go for as much as $40,000, although for the majority, the value is between $250 and $7,500.
Scanning Mode
Large-format scanners allow users to choose among color, monochrome, or grayscale modes, regardless of whether they are CIS or CCD scanners. However, CIS scanners are preferred when dealing with technical drawings. That, in addition to the monochrome scanning mode. That’s not to say that the other modes won’t yield any scan. They will, only that they won’t be usable for raster to vector conversion.
Color
The color mode is applicable when you’re scanning color documents and intend to retain the color graphics or all color information. Color scanning mainly utilizes red, green, and blue (RGB) colors to create an image. Each color gets stored as a layer, and the resultant three layers combine to form a single, final image.
Scanners use different methods to create each layer – in isolation. Some scan the image three times by shining a white light through a blue, green, and red filter, separately. However, this method is slow. Other types of scanners use three different light sources that ultimately create RGB light. Some scanners use a third approach whereby a filter separates the three colors once the light has been reflected from the image.
Other than the approach, the color mode further consists of 8-bit and 24-bit color options. The former uses RGB combinations that result in 256 colors. In comparison, the latter utilizes multiple RGB combinations to produce over 16 million colors. Thus, the 24-bit option results in a very realistic image because of how it represents color more accurately. But the file size is often too large and it also requires a lot of time for just one scan.
Color scanning is perfect for photography.
Grayscale
Scanners produce grayscale using either of these two methods:
- Gray error diffusion (or)
- True gray
Gray error diffusion merely simulates gray images. It works by placing black pixels in a predefined matrix instead of utilizing true gray pixels. Gray error diffusion is a halftoning category and is mostly preferred when dealing with text documents.
True gray, on the other hand, contains a total of 256 shades of gray and is ideal for photographic images. Further, if you’re scanning black and white photographic prints, it’s advisable that you use this grayscale option because it’s a guaranteed way of enabling your scanner to capture the fine details within the graphics.
Monochrome
Monochrome is also known as black and white, 1-bit, or binary mode. It’s the preferred mode when dealing with GIS maps or technical drawings that predominantly line art or line-based visuals. As the name suggests, the monochrome mode creates images that only consist of 2 colors – black and white.
Monochrome is the ideal color setting for raster to vector conversion. It doesn’t require any post-processing as is the case with grayscale. Post-processing is necessary for grayscale because vectorizing grayscale images results in very many vector objects, each of which could be made up of different colors. A combination of all these aspects complicates the process and consumes too much time if you’re hell-bent on addressing them. This, therefore, means that, for your peace of mine, choose black and white or monochrome on your scanner.
Resolution
Scan resolution is another scanner setting that should be considered whenever you’re looking to undertake a raster to vector conversion. Scan resolution is measured in dots per inch (dpi).
Now, a scanner supports a wide range of scan resolutions. The range is so vast that some manufacturers even go overboard by including software that enhances the resolution beyond what their scanners can physically support. In this regard, you should know that any manufacturer purporting that their scanner supports a scan resolution of 9600 dpi is probably lying. Don’t fall for such marketing gimmicks.
A high scan resolution might sound like a good thing. In theory, it is. But in practice and reality, it isn’t. A high scan resolution doesn’t improve image quality. In fact, it makes it possible for the scanner to capture even the unwanted details on the paper, e.g., dirt or small stains, which is really not what quality encompasses.
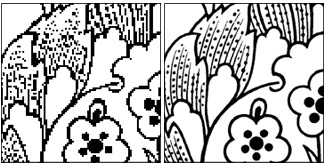
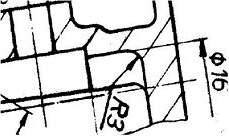
The perfect scan resolution setting is between 200 and 400 dpi – the higher the resolution, the smoother the image, as in the image below. Anything beyond that is self-defeating, particularly when dealing with technical drawings. Furthermore, for monochrome scans, the human eye stops perceiving any difference beyond a certain scan resolution. But if you’re scanning other types of images, a higher dpi is allowed.
Thresholding
In a monochrome scan, the background is usually white, while the foreground is black as it contains the drawing (ink). A scanner allows for adjustments of the foreground and background through a setting called the threshold, which ultimately enhances the visual quality of the image.
By tinkering with the threshold settings, what you’re essentially doing is changing the threshold value. The best threshold value incorporates all desired foreground and background information. It doesn’t fade the background or the information contained in the drawing, nor does it include unwanted background details, thereby making it impossible to decipher the contents of the raster file. The threshold value is paramount if you intend to have a quality scanned image.
Now, some scanners have some inbuilt automatic threshold control techniques, which, when combined with manual ones, result in the best image quality. The automatic control methods mainly ensure that the background is as white as possible by removing any dirt. It, therefore, follows that the manual techniques focus on the foreground – the black/ink as it were – by making these specific pixels black.
File Format
File formats that store raster images are innumerable. While you can save a scanned image in any format you wish, the resultant digitized file won’t be suitable for raster to vector conversion.
For instance, you might want to save your raster images as JPEG files, perhaps because this is a popular file format for images. It’s, however, not ideal. After all, its quality reduces the more it’s saved anew all because it utilizes lossy compression. This form of compression discards some information in a bid to reduce the file size.
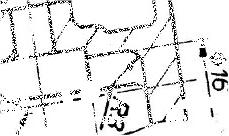
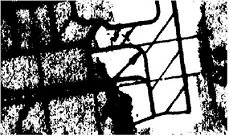
JPEG file format also struggles with linework and texts, basically any drawing that features hard lines. The lossy compression reduces quality so much that the image now looks fuzzy. The fuzziness arises from the faint, gray outlines surrounding the lines or texts, resembling clouds, as in the image below. When this happens in closely drawn linework, some lines may appear to be overlapping.

This analogy calls for a lossless file format. We recommend that you use the TIFF format because it provides much more control over your image. The TIFF format still provides image compression, and at a high rate, but doesn’t lose any information.
Alternatively, you could save your file as a PDF. In this case, the scanned raster image will be embedded in the PDF file. But the PDF file could be too large, necessitating compression. If this happens to be the case for you, you should choose TIFF as the compression option.
Additional Tips
You can also go beyond the scanner settings for raster to vector conversion by implementing the following measures/tips.
Before Scanning
- Always keep the scan bed clean. The bed shouldn’t have any dust particles or stains.
- Understand your scanner’s hardware and software. Mastery of these two aspects is guaranteed to hasten the scanning process in addition to ensuring that you’ll have the best quality scans all the time.
- Turn off any features that will enhance the raster image’s contrast or sharpness. Sharpness and contrast depend on the state of the document being scanned. Trying to change these two aspects only enhances the raster image’s aesthetic appeal but complicates vectorization.
After Scanning
- Don’t alter the scanned raster file before vectorization. The alteration methods that are unideal remove vital information from the scan, e.g., adding filters or scaling the image. But this doesn’t mean that some image correction isn’t necessary.
- Make sure that the scanner captures the full extent of your image. If it so happens that it has captured even unwanted areas, you can crop your digitized file.
- Ensure that the lines are solid – not broken or dithered – and the texts are legible.